
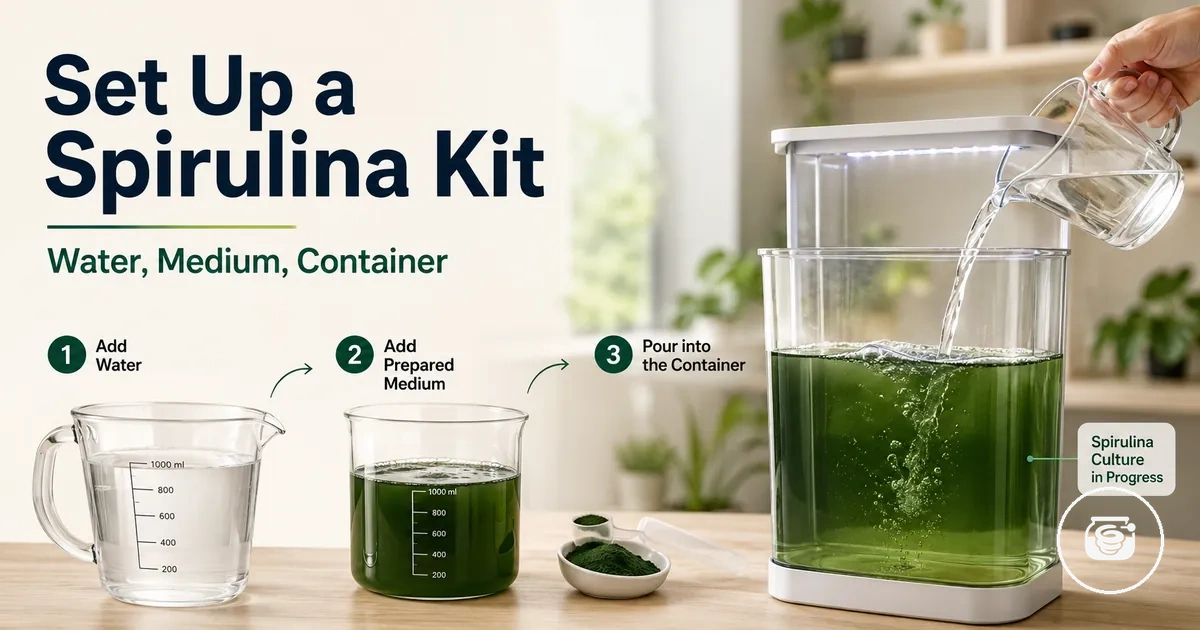
How to Set Up a Spirulina Growing Kit
Set up a spirulina growing kit by preparing a clean culture container, mixing the grow medium with chlorine-free water and nutrient salts, transferring the starter culture gently, positioning the grow light, and recording pH and temperature on the first day. The setup window ends after the culture has a prepared medium, stable placement, and an initial pH and water-thermometer reading; ongoing growing, maintenance, and harvesting begin afterward.
A packaged set that combines these functions belongs to the broader category of spirulina growing kits .
The required water volume, nutrient concentration, pH range, temperature range, light position, and aeration method must match the instructions supplied with the specific culture and medium. For a concrete model-specific example, Algae Research Supply states that its 5-gallon spirulina farming kit requires a starting culture, chlorine-free water, an air supply, a light source, and a growing vessel such as a 10-gallon aquarium; these values apply to that kit rather than every home setup. A packaged set that combines these functions belongs to the broader category of spirulina growing kits.
The required water volume, nutrient concentration, pH range, temperature range, light position, and aeration method must match the instructions supplied with the specific culture and medium.
Shortcuts create early culture risk when cleaning residue remains, nutrient salts are partly dissolved, untreated water enters the medium, or light and temperature are not checked after transfer. A review published in Plants identifies water quality, pH, temperature, lighting, stirring, dissolved particles, inoculation volume, and nutrient availability as material cultivation conditions, so each condition should have an observable setup state rather than an open-ended instruction. Complete the setup only when the container and tools are clean, the medium is dissolved, the starter culture is transferred without forceful mixing, and the first-day measurements are within the kit-specific limits.
- Confirm that the culture container, grow medium, nutrient salts, starter culture, pH testing tool, grow light, water thermometer, and any specified aeration equipment are present.
- Clean and rinse the container and measuring tools until no visible residue remains, then keep them away from unclean contact surfaces.
- Prepare the instructed volume of chlorine-free water and dissolve the specified grow medium and nutrient salts completely before adding the culture.
- Check the prepared medium against the kit-specific pH and temperature values, then transfer the starter culture gently.
- Position the culture under the specified light arrangement, start any required aeration, and record the first-day pH, temperature, and visible culture condition as the setup baseline.
Table of Contents
Spirulina Kit Setup Requirements Before Installation
Spirulina kit setup requirements before installation are the parts and preparation conditions that should be ready before a spirulina growing kit is installed and the starter culture is introduced. The required items include the kit, culture container, grow medium, nutrient salts, pH test strips, grow light, water thermometer, suitable water, and a clean workspace. Preparing these requirements before installation reduces avoidable culture stress caused by unsuitable equipment or preparation conditions.
Preparing these requirements before installation reduces avoidable culture stress caused by unsuitable equipment or preparation conditions.
Spirulina kit setup requirements before installation are illustrated below to show the main components and preparation conditions that should be confirmed before installation. The image identifies the culture container, grow medium or nutrient salts, pH test strips, grow light, and water thermometer so each requirement can be recognised before the installation process begins.
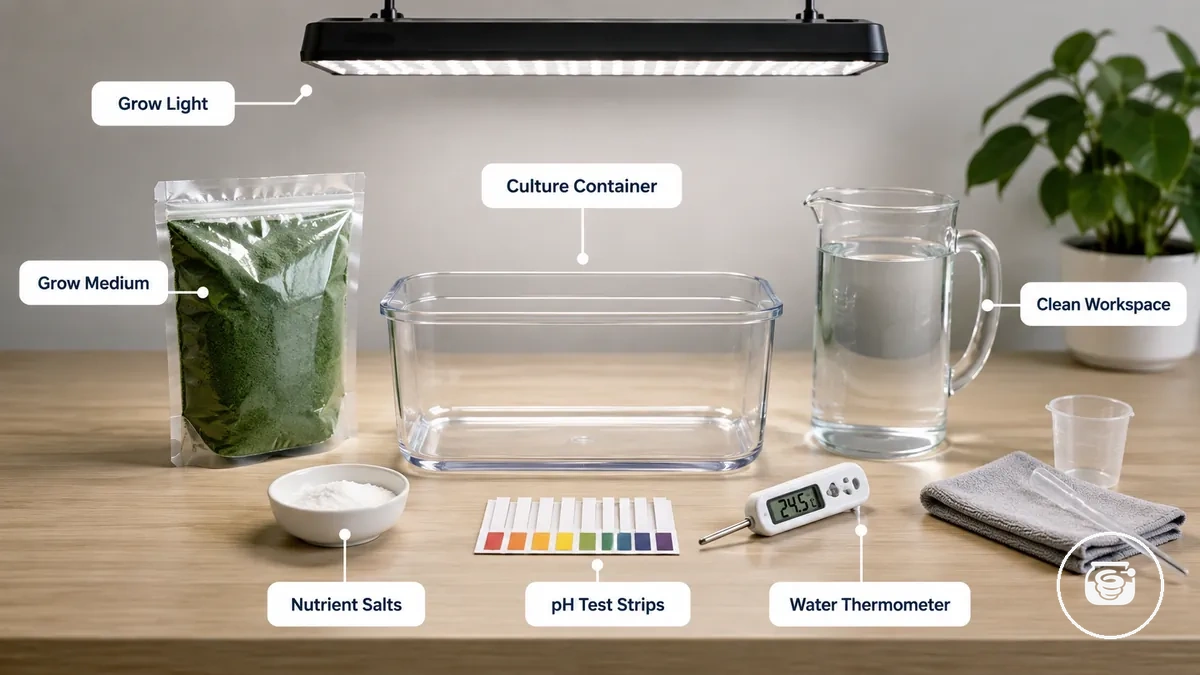
According to Algae Research Supply, its Spirulina Farming Kit is supplied for a 5-gallon (about 19 L) culture and recommends using a 10-gallon (about 38 L) aquarium with chlorine-free water, an air pump, and a suitable light source before inoculation. This manufacturer example demonstrates that container capacity, water suitability, lighting, and measurement tools should all be prepared before installation, while the exact pH, temperature, and nutrient concentration remain dependent on the formulation supplied with the specific kit. The checklist below summarises the required readiness items rather than the installation procedure itself.
- Kit: Confirm that all supplied components are present before installation so no required setup item is missing.
- Culture container: Use a clean culture container of the capacity specified for the selected kit to minimise contamination before the starter culture is added.
- Grow medium and nutrient salts: Prepare the supplied growing medium with the matching nutrient salts because the formulation determines the correct culture environment.
- pH test strips: Check that the prepared medium reaches the pH specified by the kit manufacturer before inoculation because acceptable values differ between formulations.
- Grow light and water thermometer: Position the grow light and verify the water temperature against the manufacturer's stated operating range before installation.
- Water suitability and clean workspace: Use chlorine-free water and prepare a clean workspace so contaminants and disinfectants are less likely to damage the culture during installation.
These requirements establish installation readiness rather than explaining the complete growing process. More detailed information about individual kit components and broader cultivation conditions belongs to the separate guide covering required growing conditions, not to this overview section.
Culture Container, Grow Medium, Nutrient Salts, and Testing Tools
Culture container, grow medium, nutrient salts, and testing tools each control a different setup condition before the starter culture is added. The culture container provides the required cleanliness and working volume, the grow medium supplies dissolved nutrients and alkalinity, nutrient salts establish the intended concentration, and testing tools such as pH strips provide measurement for first-day correction. The image below identifies these components and the setup role each one performs.
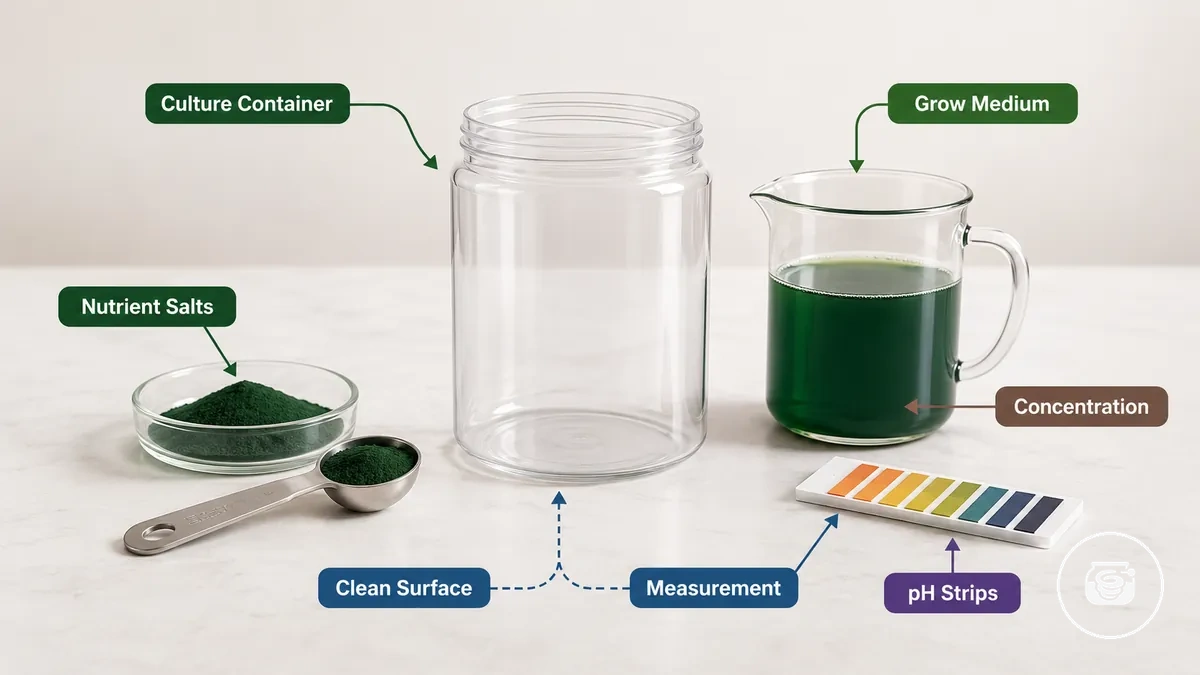
Using an unsuitable component or preparing it incorrectly increases contamination risk or changes the prepared medium before cultivation begins. According to the University of Massachusetts Amherst Extension Greenhouse Crops and Floriculture Program, pH and soluble salt measurements should be taken from the prepared growing medium because testing confirms whether the root or culture environment matches the intended nutrient condition. For example, if a kit specifies preparing 5 L of medium but the nutrient salts are mixed into 6 L instead, the lower concentration can require first-day correction before the starter culture is introduced.
- Culture container: The component should be clean and sized for the prepared culture volume because cleanliness reduces contamination risk and the correct volume helps avoid unintended dilution.
- Grow medium: The grow medium provides dissolved nutrients and alkalinity needed before inoculation. It should be completely mixed because undissolved material can delay culture readiness.
- Nutrient salts: Nutrient salts determine the concentration and balance of the prepared medium. Incorrect measuring or incomplete mixing changes the intended nutrient concentration and can affect early culture establishment.
- Testing tools: pH strips or equivalent testing tools provide measurement for first-day correction by confirming that the prepared medium matches the range specified by the kit manufacturer before the starter culture is added.
- Measuring spoon or cup: A dedicated measuring tool helps prepare repeatable nutrient concentrations and reduces mixing errors during setup.
Water Quality, Light Access, and Temperature Readiness
Water quality, light access, and temperature readiness are the compatibility conditions that should be suitable before transferring the starter culture into the prepared growing medium. Chlorine-free water, an alkaline medium prepared according to the kit instructions, suitable light access, and a stable temperature measured with a thermometer form the minimum compatibility checks because each condition influences early culture stress and establishment. The image below highlights the main environmental conditions that should be confirmed before culture transfer.
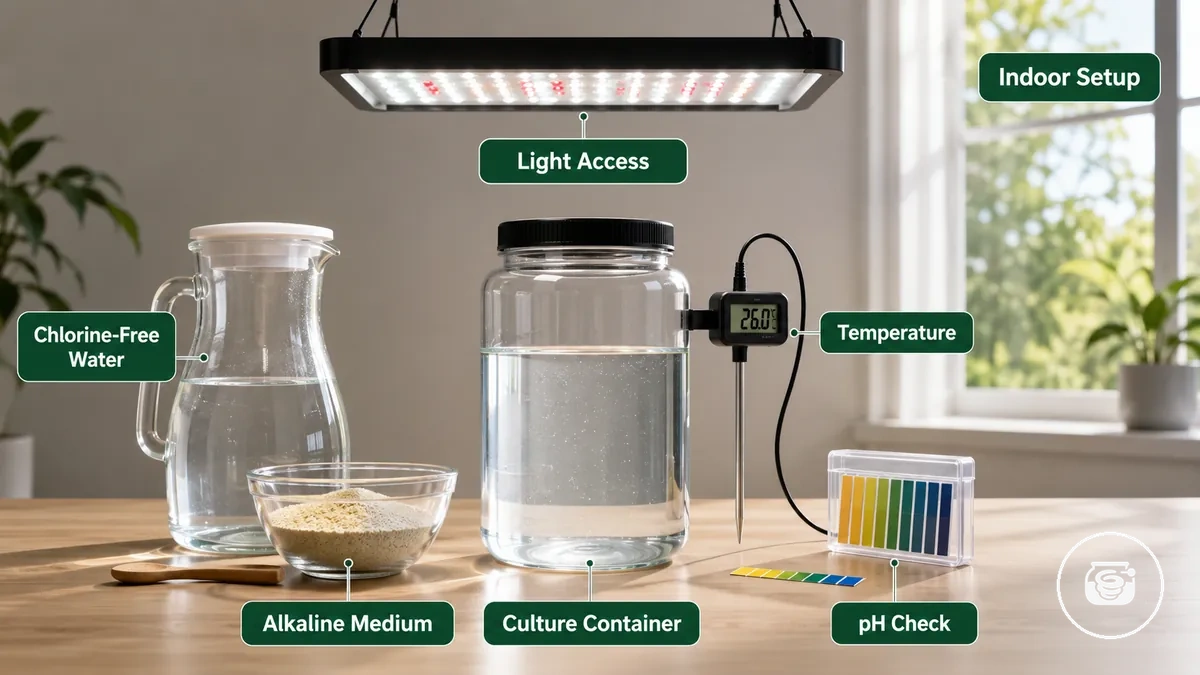
According to the U.S. Environmental Protection Agency, chlorine is widely used to disinfect drinking water, making chlorine removal necessary when a cultivation guide specifies chlorine-free water. Manufacturer instructions typically define the acceptable pH, alkaline medium formulation, light arrangement, and operating temperature for their own spirulina kits, so these values should be followed instead of applying a universal threshold. For example, if a kit prepares 5 L of growing medium but the culture container is placed beside a west-facing window where afternoon sunlight noticeably increases water temperature, moving the setup to a cooler indoor location before inoculation helps maintain more stable first-day conditions.
Environmental Protection Agency, chlorine is widely used to disinfect drinking water, making chlorine removal necessary when a cultivation guide specifies chlorine-free water.
Water quality, light access, and temperature readiness should be reviewed together because each condition supports the same first-day setup environment before the starter culture is transferred.
| Condition | What to check | Why it matters | When to verify |
|---|---|---|---|
| Water quality | Use chlorine-free water and prepare the alkaline medium according to the kit instructions. | Residual chlorine or an incorrectly prepared medium can increase culture stress. | Before mixing the starter culture. |
| Light access | Confirm that the light source provides even coverage without excessive heat around the culture container. | Suitable light supports early photosynthesis while limiting unnecessary heat stress. | Before selecting the final indoor setup location. |
| Temperature readiness | Measure the prepared medium with a thermometer and compare the reading with the operating range specified by the kit manufacturer. | A stable temperature helps reduce the risk of delayed growth or transfer shock. | Immediately before culture transfer and after the container is positioned. |
| pH condition | Verify that the prepared medium matches the pH specified by the kit manufacturer. | An unsuitable pH can reduce starter culture readiness even when water and lighting are appropriate. | After the growing medium is mixed and before inoculation. |
Cleaning the Container and Preparing the Setup Area
Cleaning the container and preparing the setup area means removing visible residue from the culture container and measuring tools, preparing a clean workspace, and arranging the equipment before water, prepared medium, or the starter culture are introduced. This installation step reduces contamination risk by keeping unwanted material away from the first culture and preserving a controlled setup order. The image below highlights the equipment and preparation conditions that should be completed before installation continues.
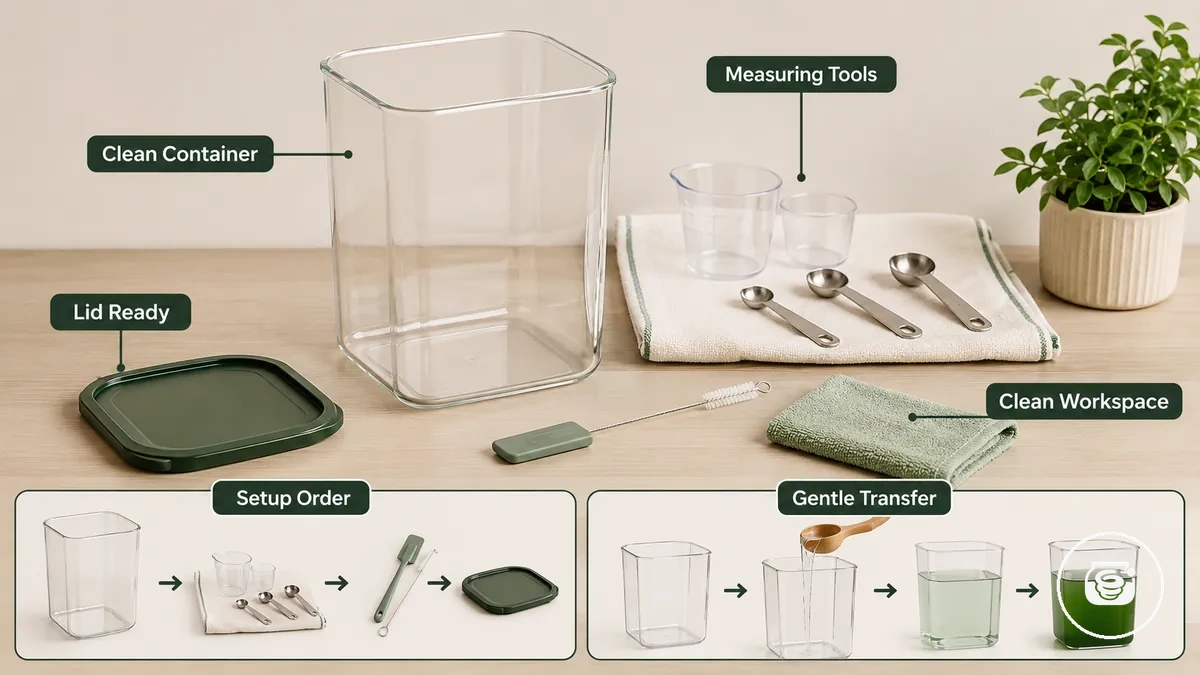
Cleaning the container and preparing the setup area should be completed before preparing the growing medium or transferring the starter culture. According to the U.S. Centers for Disease Control and Prevention, cleaning removes dirt and many contaminants from surfaces before use, making residue removal an important preparation step rather than a substitute for later maintenance. For example, if a measuring spoon retains approximately 2 mL of concentrated nutrient solution from an earlier batch and is used to prepare a new 5 L culture, the remaining residue changes the intended mixture until the tool is cleaned. Complete these preparation steps before checking temperature and making the gentle transfer so the installation sequence remains controlled.
- Clean the container: Wash and rinse the culture container until no visible residue remains, then allow it to drain before adding water or prepared medium.
- Rinse measuring tools: Clean measuring spoons, cups, stirring tools, and any thermometer that will contact the prepared medium so leftover material is not carried into the new mixture.
- Prepare the clean workspace: Wipe the setup surface with a clean cloth and keep cleaned tools separated from unclean contact points to reduce contamination risk.
- Position the lid or cover: Keep the lid or cover ready beside the container so it can be placed immediately after the starter culture is transferred if the kit instructions require it.
- Arrange the setup order: Position the clean container, measuring tools, light source, and other required equipment before mixing the prepared medium to reduce unnecessary handling.
- Confirm immediate placement: Verify the intended setup location and temperature conditions before the gentle transfer of the starter culture because moving the culture after transfer can disturb the prepared setup.
Cleaning the container and preparing the setup area is complete when the culture vessel, measuring tools, lid, and workspace are clean and arranged before any water or growing medium is added. The next installation step is preparing the growing medium and transferring the starter culture according to the instructions supplied with the selected spirulina growing kit.
Preparing Water and Mixing the Growing Medium
Preparing water and mixing the growing medium establishes the first chemical environment for the starter culture before inoculation. Use chlorine-free water, dissolve the growing medium and nutrient salts completely, and verify the pH reading against the instructions supplied with the selected kit before culture transfer. The exact nutrient amount, pH target, and any temperature requirement are kit-specific values, so they should be taken only from the manufacturer's instructions rather than a universal recipe.
Prepare water before adding the growing medium because water treatment status affects the dissolved medium and the starter culture.
Prepare water before adding the growing medium because water treatment status affects the dissolved medium and the starter culture. Measure the nutrient salts using the amount specified for the selected kit, then mix until no visible particles remain and the dissolved medium appears uniform. According to horticultural guidance from the University of Florida IFAS Extension, complete dissolution and uniform mixing help create a consistent growing medium before use. For example, if a kit prepares 5 L of growing medium but some nutrient salts remain undissolved, the mixture is not yet ready because the nutrient concentration and pH reading may change after additional mixing.
Confirm transfer readiness only after the chlorine-free water, dissolved medium, nutrient salts, and pH reading all match the selected kit instructions.
Confirm transfer readiness only after the chlorine-free water, dissolved medium, nutrient salts, and pH reading all match the selected kit instructions. If the pH reading falls outside the manufacturer's specified range or the growing medium is not fully dissolved, correct the mixture before introducing the starter culture because adjustment is more reliable before inoculation than after it.
- Prepare chlorine-free water in the culture vessel.
- Measure the nutrient salts according to the selected kit instructions.
- Mix the growing medium until the nutrient salts dissolve completely.
- Take a pH reading after the medium is fully dissolved.
- Compare the pH reading with the kit instructions and adjust only if directed.
- Confirm the dissolved medium is uniform before transferring the starter culture.
Preparing water and mixing the growing medium should be checked one final time before culture transfer because each medium condition contributes to transfer readiness.
| Medium factor | Setup check | Risk if wrong |
|---|---|---|
| Water treatment | Use chlorine-free water. | Residual disinfectants can increase culture stress. |
| Dissolved medium | Confirm all nutrient salts have dissolved completely. | Uneven nutrient availability. |
| Nutrient salts | Measure only the amount specified by the selected kit. | Nutrient imbalance. |
| pH reading | Verify the reading against the kit instructions before inoculation. | Adjustment may be required before starter culture transfer. |
Chlorine-Free Water and Alkaline Medium Conditions
Chlorine-free water and alkaline medium conditions must match the selected kit or growing-medium instructions before the starter culture is added. Water quality should show no intended chlorine treatment, the medium should be fully dissolved, and the pH result should fall within the kit-specific range because unsuitable water or alkalinity can increase culture stress. No single pH value is established for every kit, so the supplied instructions define the acceptable condition.
Confirm each criterion below before introducing the starter culture.
Residual chlorine, partly dissolved medium, or a pH result outside the specified range means the mixture is not ready for transfer. Use the stated water-treatment method, mix until no visible solids remain, and repeat the pH test after dissolution because later mixing can change the reading. Light access and temperature readiness support stable conditions after placement, but they do not correct unsuitable water or medium chemistry. Confirm each criterion below before introducing the starter culture.
| Condition | What to check | Why it matters | When to verify |
|---|---|---|---|
| Water quality | Confirm that the prepared water meets the kit's chlorine-free water requirement. | Water that does not meet the stated treatment condition can increase early culture stress. | Before adding the growing medium. |
| Dissolved medium | Mix until the medium is uniform and no visible nutrient salts remain. | Incomplete dissolution can leave uneven nutrient concentration and an unreliable pH result. | Before testing pH. |
| Alkaline medium | Compare the measured pH with the exact range stated in the kit or medium instructions. | A result outside that specified range requires correction before transfer. | After complete mixing. |
| Transfer readiness | Confirm chlorine-free water, a fully dissolved medium, and an acceptable pH result together. | The starter culture then enters the prepared chemical environment defined for that kit. | Immediately before inoculation. |
The available section evidence does not establish one universal pH range or water-treatment procedure for all spirulina kits. Verify those values in the instructions for the specific starter culture and growing medium before transfer.
Nutrient Salts and Medium Dilution Before Culture Transfer
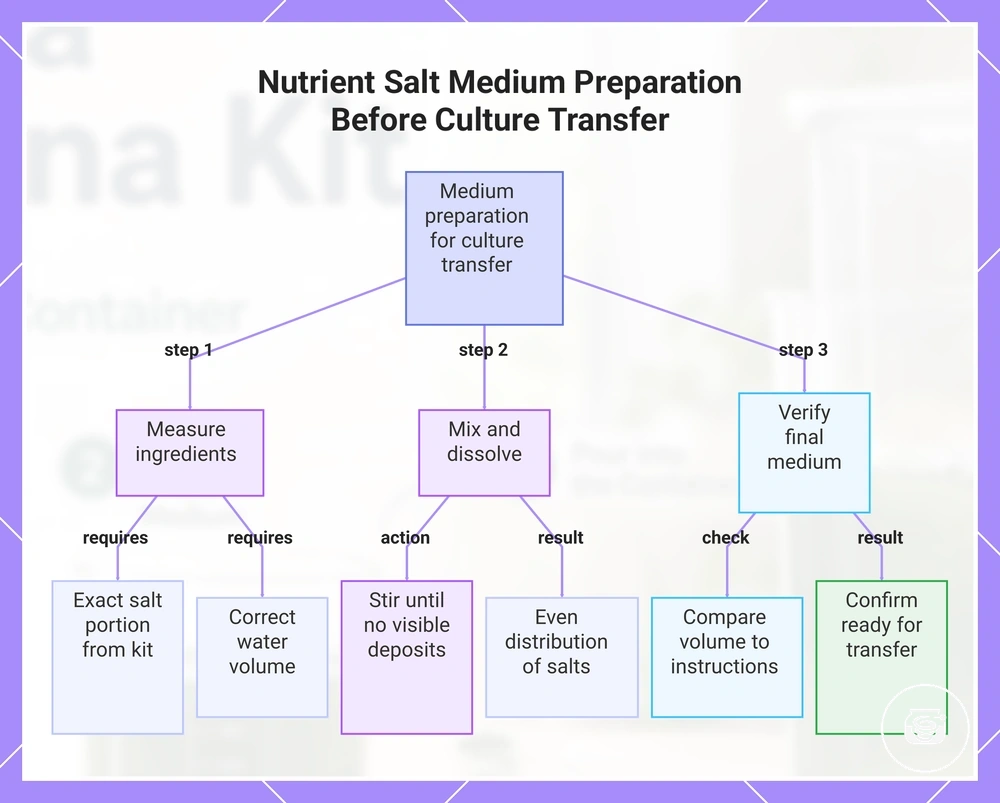
Nutrient salts and medium dilution before culture transfer determine the concentration and even distribution of the prepared medium. The measured amount of nutrient salts must match the water volume stated in the selected kit instructions, and the salts should be fully dissolved before the starter culture is added. The reviewed evidence does not establish one concentration or dilution ratio for all spirulina kits, so the kit or medium instructions provide the required value.
Nutrient salts and medium dilution before culture transfer determine the concentration and even distribution of the prepared medium.
An incorrect measured amount, incomplete dissolving, or excess medium dilution changes the intended medium strength and may reduce starter culture tolerance. Stir until the dissolved salts are distributed evenly and no solid deposits remain, then compare the final water volume with the kit instructions. For example, suppose instructions call for one measured salt portion in 5 L of water, but the same portion is mixed into 4 L; this illustrative mixture is 25% more concentrated by volume than intended and should be corrected before transfer. Cloudy mixing caused by visible undissolved material indicates that the medium is not yet ready, although colour alone should not replace the supplier's readiness criteria.
- Measure: Use the exact salt amount and water volume stated in the selected medium instructions; an unverified amount creates an unknown concentration.
- Dissolve: Stir until no visible salt particles or deposits remain; partial dissolution prevents even distribution.
- Check dilution: Confirm the final liquid volume matches the specified preparation volume; adding too little water increases strength, while adding too much water reduces it.
- Confirm readiness: Transfer the starter culture only when the medium is uniformly mixed and meets every visible or measured condition stated by the supplier.
This chart outlines the key steps to measure, dissolve, and verify the correct nutrient salt concentration and dilution before adding a starter culture.
Adding the Spirulina Starter Culture to the Medium
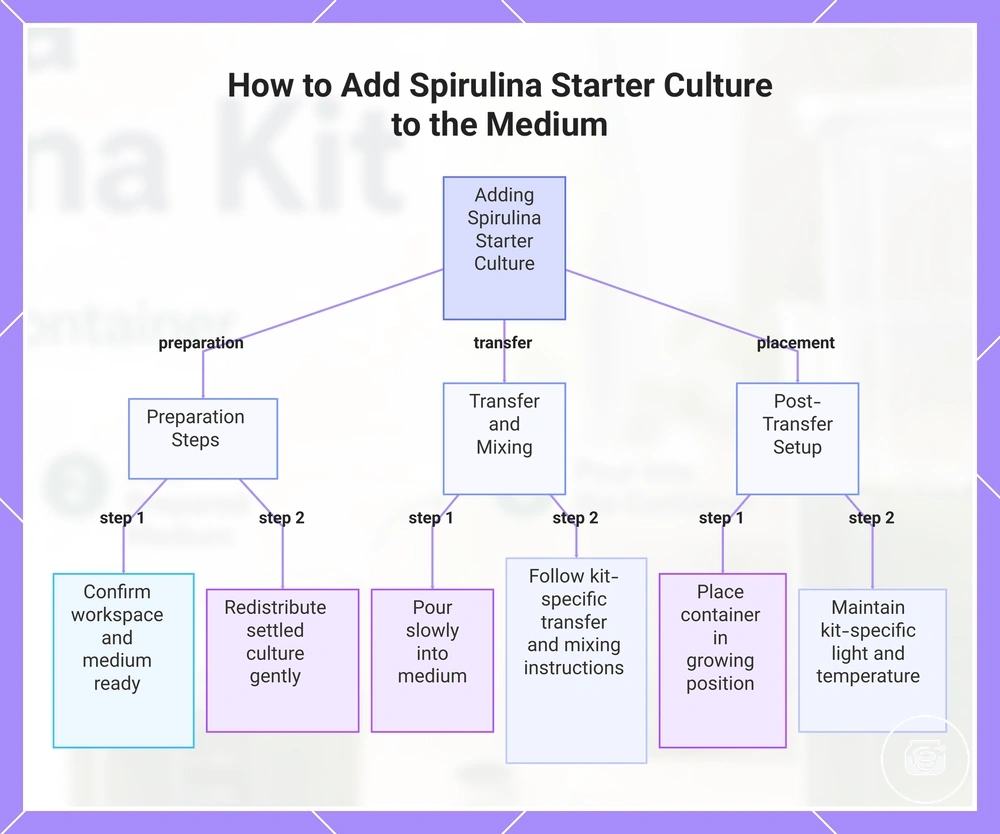
Adding the spirulina starter culture to the prepared medium is the installation step where the living culture is introduced into the growing medium under conditions that minimise contamination risk, temperature shock, and uneven mixing. The starter culture should be transferred only after the prepared medium, container, and clean workspace are ready, because the reviewed evidence does not establish one universal transfer volume, acceptable temperature difference, or mixing method for every spirulina kit; those values remain manufacturer-specific and should be verified in the selected kit instructions.
This numerical example is illustrative because the reviewed evidence does not specify a universal starter culture volume or transfer ratio.
If a liquid starter culture has settled during transport or storage, gently swirl the closed container to redistribute the culture before opening it rather than shaking it vigorously. Open the container only when the prepared medium is ready, pour the starter culture slowly into the culture vessel, and use gentle mixing only if the kit instructions specify it because excessive agitation can increase culture stress. For example, suppose a kit prepares 5 L of growing medium and the liquid starter culture has formed a settled layer after transport; gently redistributing the culture before transfer helps create a more even inoculation without changing the prepared medium volume. This numerical example is illustrative because the reviewed evidence does not specify a universal starter culture volume or transfer ratio.
If a liquid starter culture has settled during transport or storage, gently swirl the closed container to redistribute the culture before opening it rather than shaking it vigorously.
Adding the spirulina starter culture to the medium is complete when the transfer has been performed gently, the container has been placed immediately in its intended growing position, and the setup order has been preserved without unnecessary movement. The next immediate action is to confirm the light source and temperature conditions required by the selected kit and begin only the initial observation steps specified for the installation stage, not routine maintenance.
- Prepare: Confirm the clean workspace, clean container, and prepared medium are ready before opening the starter culture to reduce contamination risk.
- Inspect: If a liquid starter culture has settled during storage or transport, gently swirl the closed container to redistribute the culture; avoid vigorous shaking.
- Transfer: Pour the starter culture slowly into the prepared medium while avoiding splashing or unnecessary exposure of the culture vessel.
- Mix: Apply only gentle mixing when the selected kit instructs it because forceful stirring can increase culture shock.
- Place: Move the container immediately to its intended location and maintain the temperature and light conditions specified for the selected spirulina growing kit.
This chart shows the key steps and checks for adding spirulina starter culture to the growing medium, including preparation, transfer, and post-transfer setup.
Positioning Light, Aeration, and Temperature Controls
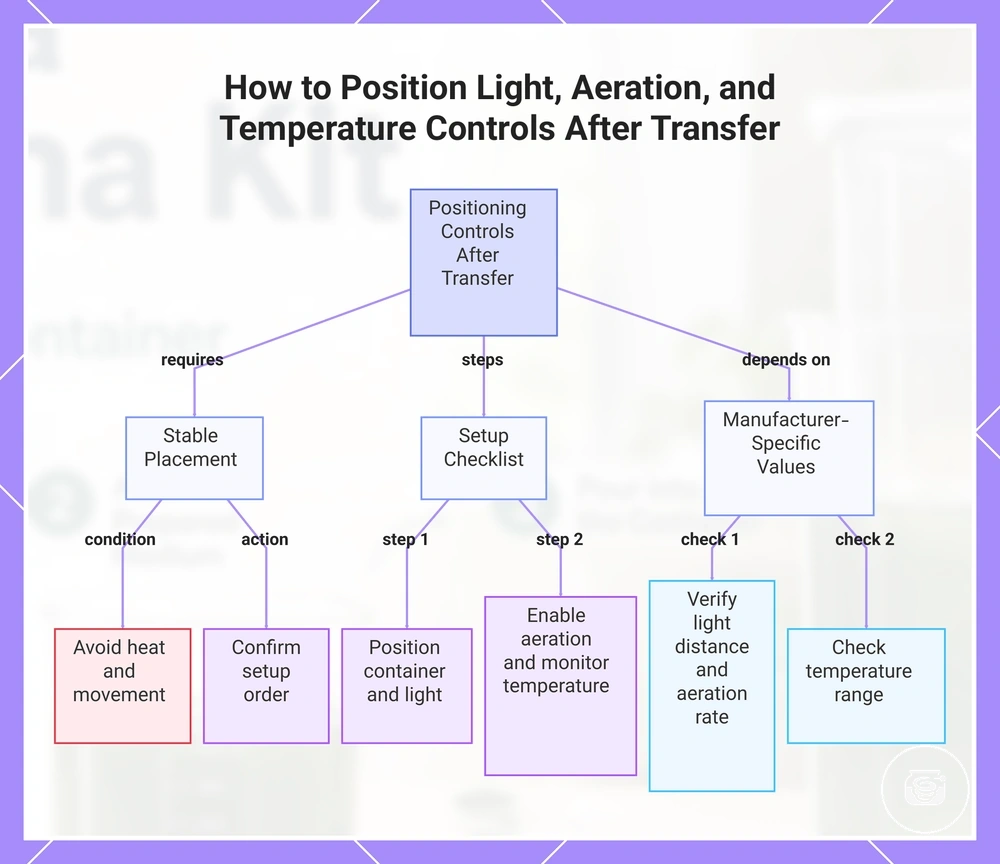
Positioning light, aeration, and temperature controls converts the prepared medium and starter culture into a controlled starter environment after the gentle transfer is complete. The container should remain in its intended indoor location with the light source, aeration component, and thermometer arranged according to the selected kit because the reviewed evidence does not establish one universal light distance, coverage area, aeration rate, or operating temperature for every spirulina growing kit. Those values are manufacturer-specific and should be verified in the supplied instructions before the installation stage is complete.
Those values are manufacturer-specific and should be verified in the supplied instructions before the installation stage is complete.
Positioning light, aeration, and temperature controls should be completed before leaving the culture undisturbed because stable placement reduces unnecessary movement during early setup. Place the light source so it provides even coverage across the container without creating avoidable heat, use aeration or gentle movement only when the selected kit requires circulation to reduce settling, and monitor the prepared medium with a thermometer so temperature changes can be identified promptly. For example, suppose a 5 L culture vessel is positioned beside a warmer window after transfer; checking the thermometer immediately after placement confirms whether the temperature still matches the manufacturer's specified operating range before setup continues. This numerical example is illustrative because the reviewed evidence does not define one universal light distance or temperature threshold for all spirulina kits.
After the placement checklist is complete and the container remains stable, the next stage is to grow spirulina after setup .
Positioning light, aeration, and temperature controls should favour a stable indoor location rather than a place exposed to fluctuating heat, direct sunlight, or repeated movement because those conditions can require corrective repositioning before routine cultivation begins. After the placement checklist is complete and the container remains stable, the next stage is to grow spirulina after setup.
- Position the container: Place the container in its intended indoor location immediately after the gentle transfer, and avoid repeated movement because it can disturb the starter culture.
- Arrange the light source: Position the light so it provides even coverage across the prepared medium, and avoid placements that expose the culture vessel to unnecessary heat.
- Enable aeration if required: Start the aeration component only when the selected kit specifies gentle circulation, and avoid excessive movement that can increase culture stress.
- Monitor temperature: Check the thermometer after immediate placement and compare the reading with the operating range specified by the kit manufacturer before continuing.
- Confirm setup order: Verify that the light source, aeration, and temperature controls remain stable before leaving the starter culture undisturbed for the initial observation period.
This chart outlines the steps and checks for positioning controls after transfer, focusing on stable placement, setup actions, and manufacturer-specific values.
Light Coverage and Direct-Sunlight Protection
Light coverage and direct-sunlight protection require the starter culture to receive consistent illumination across the container without direct heat causing the prepared medium to warm beyond the kit-specific temperature range. The light source type, distance, exposure period, and acceptable temperature are not universal values; use the selected kit instructions to set each one. This placement supports photosynthesis while reducing uneven exposure and heat-related culture stress.
This placement supports photosynthesis while reducing uneven exposure and heat-related culture stress.
Position the light source so its illuminated area covers the full culture surface and check the container for darker zones, concentrated glare, or a rising thermometer reading. Direct sunlight is a risky placement condition when it produces rapid heat buildup, while an indoor light source is suitable only when its distance and coverage match the manufacturer’s instructions. For example, suppose an illustrative 5 L culture vessel has even artificial-light coverage but its temperature rises after being moved into afternoon sunlight; return the container to the controlled indoor position and confirm temperature readiness before leaving the starter culture undisturbed. The 5 L volume is illustrative because the reviewed evidence does not establish one universal vessel size, lighting distance, exposure schedule, or temperature threshold for all spirulina kits.
Use the comparison below to confirm stable conditions before completing placement.
Light coverage and direct-sunlight protection should be checked together because stronger exposure is not useful when it creates uneven illumination or excess heat. Use the comparison below to confirm stable conditions before completing placement.
| Condition | What to check | Why it matters | When to verify |
|---|---|---|---|
| Light source type | Use the artificial or natural-light arrangement specified by the selected kit. | An unsupported source type may provide unsuitable coverage or add excess heat. | Before positioning the container. |
| Light distance | Match the distance stated in the kit instructions; no universal distance is established by the reviewed evidence. | A source placed too close may create heat or glare, while excessive distance may leave weakly lit areas. | During initial placement. |
| Exposure consistency | Confirm the whole culture surface receives visually even coverage without persistent dark zones. | Uneven exposure creates inconsistent light access across the starter culture. | Immediately after the light is positioned. |
| Direct sunlight | Avoid direct sunlight when it causes a measurable temperature rise or exceeds the kit’s placement guidance. | Heat buildup can move the prepared medium outside the specified temperature condition. | During the warmest expected part of the day. |
| Temperature readiness | Compare the thermometer reading with the kit-specific operating range after final placement. | A reading outside that range requires repositioning before the setup is left undisturbed. | After the container and light source are in their final positions. |
Gentle Movement and Temperature Stability After Setup
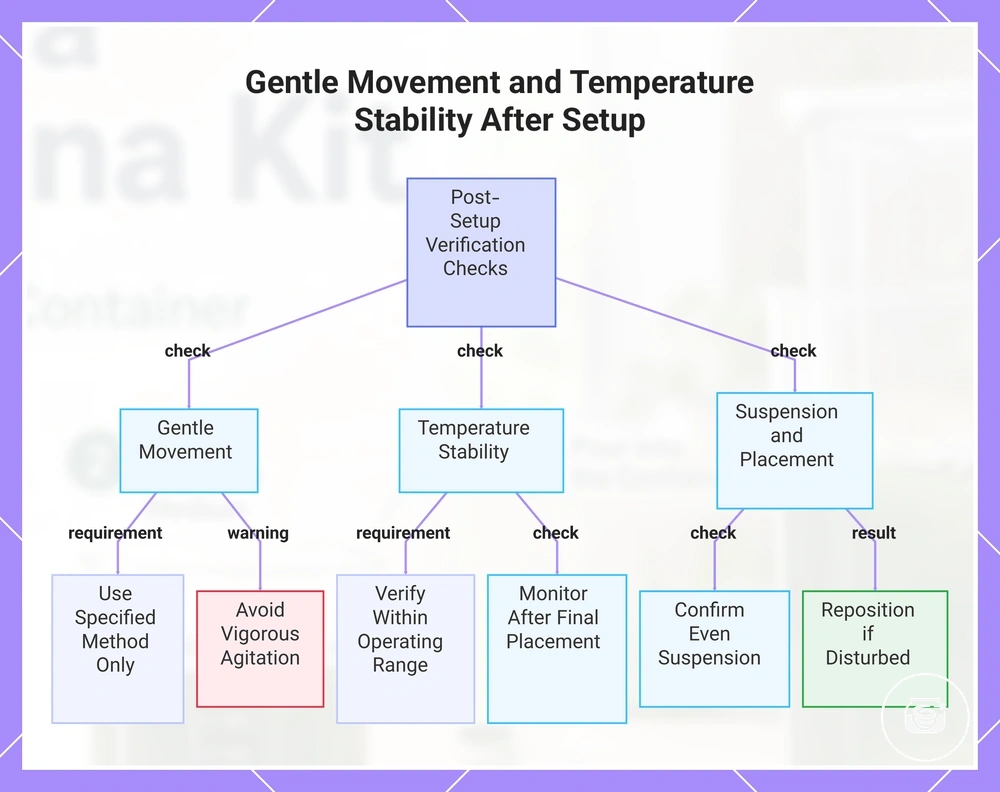
Gentle movement and temperature stability after setup are immediate verification checks that help the first culture remain evenly suspended while limiting unnecessary stress. During this setup stage, use only the aeration or manual stirring method specified by the selected spirulina growing kit, confirm the thermometer reading remains within the manufacturer's operating range, and avoid unnecessary movement of the culture vessel because the reviewed evidence does not establish one universal stirring frequency, aeration rate, or operating temperature for all kits. These checks apply only to the immediate post-setup period and should not be confused with ongoing monitoring.
After these immediate checks are complete, the next stage is to maintain the culture .
Gentle movement and temperature stability after setup should be verified before leaving the culture undisturbed because settling, temperature fluctuation, or repeated container movement can indicate that the setup position requires adjustment. For example, suppose an illustrative 5 L culture vessel remains evenly suspended after gentle aeration but the thermometer reading changes after the vessel is moved closer to a warm window; returning it to the original setup area helps restore the intended post-setup condition. The 5 L volume is a hypothetical example for explanation only because the reviewed evidence does not specify a universal vessel size, movement interval, or operating temperature for every spirulina growing kit. After these immediate checks are complete, the next stage is to maintain the culture.
- Gentle movement: Use aeration or manual stirring only when the selected kit specifies it, and avoid vigorous agitation that can disturb the first culture.
- Thermometer reading: Verify that the measured temperature remains within the operating range stated by the kit manufacturer after final placement.
- Suspension: Confirm that the growing medium remains evenly suspended without obvious settling immediately after setup.
- Placement adjustment: Reposition the culture vessel if direct heat, measurable temperature fluctuation, or repeated disturbance affects the setup area.
This chart shows the immediate verification checks for gentle movement, temperature stability, suspension, and placement adjustment after setting up a spirulina culture.
Checking pH and Culture Stability on the First Day
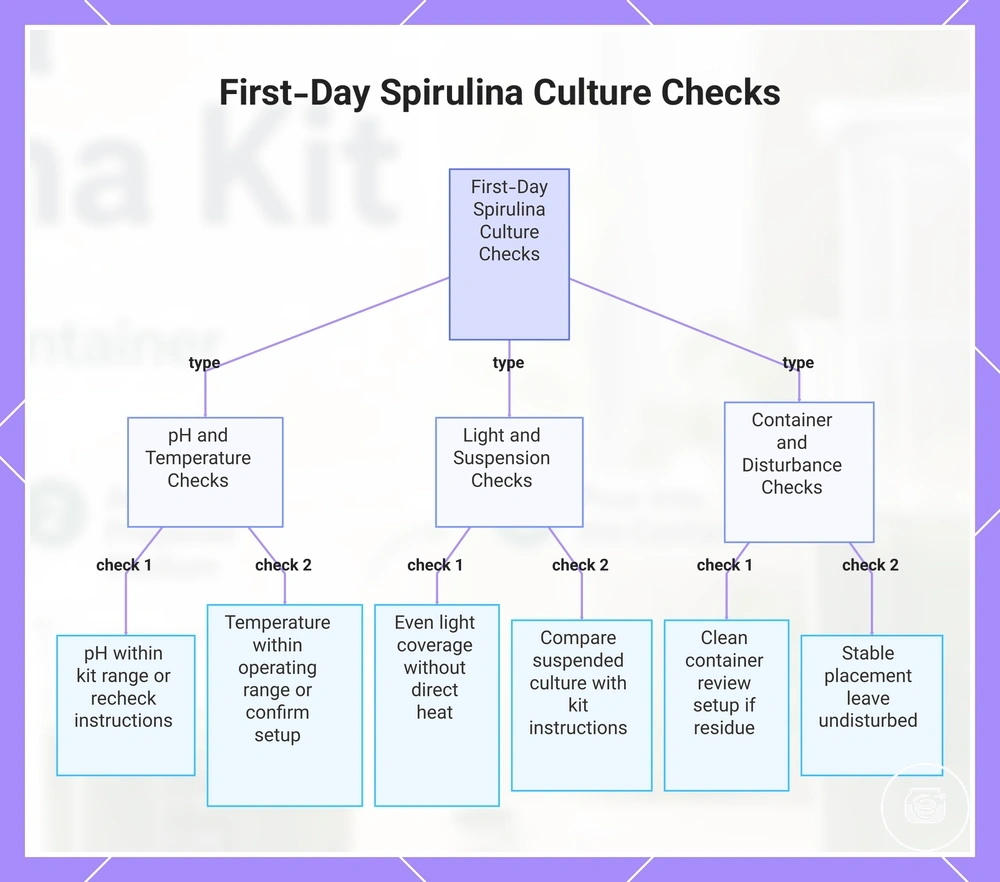
Checking pH and culture stability on the first day verifies whether the newly prepared spirulina culture remains within the setup conditions defined by the selected kit before any adjustment is made. These first-day checks organise pH testing, temperature reading, light placement, color consistency, suspended culture, and visible setup conditions without diagnosing long-term growth. The reviewed evidence does not establish one universal pH value, operating temperature, or first-day appearance for every spirulina growing kit, so each observation should be compared only with the manufacturer's kit instructions.
Suppose an illustrative 5 L culture vessel shows a pH reading within the kit's specified range but slight settling after transport.
Suppose an illustrative 5 L culture vessel shows a pH reading within the kit's specified range but slight settling after transport. In that situation, gentle circulation may restore a suspended culture if the kit instructions recommend it, while a pH reading outside the specified range or a temperature reading outside the manufacturer's operating conditions is a signal to recheck the kit instructions before making any adjustment. The 5 L vessel is a hypothetical numerical example because the reviewed evidence does not specify one universal vessel size, pH value, or temperature threshold for all spirulina growing kits.
- pH testing: Check that the pH reading matches the range specified in the selected kit instructions. Expected safe cue: Within the manufacturer's stated range. Next action: Recheck the kit instructions before adjusting the growing medium if the reading falls outside that range.
- Temperature reading: Measure the culture temperature with a thermometer after final placement. Expected safe cue: Within the operating range specified by the kit manufacturer. Next action: Confirm the setup area and light placement before moving the culture vessel.
- Light placement: Confirm that the light source provides even coverage without direct heat on the culture vessel. Expected safe cue: Uniform illumination without noticeable warming from direct sunlight or nearby heat sources. Next action: Reposition the light source or container if placement has changed.
- Color consistency and suspended culture: Observe whether the culture appears evenly suspended with color consistency expected by the selected kit. Expected safe cue: No unusual separation beyond normal first-day settling described in the instructions. Next action: Compare the observation with the kit instructions before assuming a problem.
- Container cleanliness: Inspect the culture vessel for new residue or visible foreign material after setup. Expected safe cue: Clean container surfaces with no unexpected deposits introduced after installation. Next action: Review the setup process rather than treating the observation as a contamination diagnosis.
- Visible disturbance: Check whether the culture vessel has been moved, shaken, or exposed to repeated vibration. Expected safe cue: Stable placement with minimal disturbance during the first day. Next action: Leave the culture undisturbed and repeat the first-day checks only after conditions have stabilised.
This chart shows the six first-day checks for a new spirulina culture, grouped into three categories, with expected safe cues and next actions based on kit instructions.
pH Testing After the Medium and Culture Are Combined
pH testing after the medium and culture are combined verifies whether the transferred starter culture remains in the pH condition specified by the selected kit. The combined medium should be tested with the supplied pH strips or a calibrated meter, and the result should be compared with the kit instructions because the reviewed evidence does not establish one pH range, sampling method, or adjustment threshold for every spirulina growing kit.
Make an adjustment only when a repeatable result falls outside the range stated in the kit instructions.
Suppose a pH strip gives an unclear colour match while the temperature reading, light placement, color consistency, and suspended culture appear unchanged during the first-day checks. Repeat the measurement with a fresh sample and the same test method before changing the growing medium, because an inconsistent reading is not enough to confirm reduced culture stability. Make an adjustment only when a repeatable result falls outside the range stated in the kit instructions.
- Check the sample: Collect a small sample from the combined medium without introducing residue from the container or testing tool. Expected safe range cue: A representative sample taken after the culture is evenly suspended. Next action: Repeat sampling if visible settling or contamination of the tool could affect the reading.
- Check the test method: Use the pH strip or meter according to its supplied instructions. Expected safe range cue: A clear strip colour or stable meter value obtained within the stated reading procedure. Next action: Repeat the test if the strip is expired, the colour is unclear, or the meter reading does not stabilise.
- Check the pH result: Compare the measured value with the pH range specified by the selected kit. Expected safe range cue: The reading remains inside that manufacturer-defined range. Next action: Recheck the kit instructions before adding any corrective material when the value falls outside the range.
- Check related conditions: Confirm that the temperature reading and light placement have not changed during testing. Expected safe range cue: Both conditions remain within the kit-specific setup limits. Next action: Correct the placement condition first when heat or light has changed before repeating the pH test.
- Check culture observations: Review color consistency and whether the culture remains evenly suspended. Expected safe range cue: No new visual change occurs alongside the pH reading. Next action: Record the observation and repeat the measurement rather than treating one visual variation as a reason for immediate adjustment.
Early Signs That the Culture Is Settling Correctly
Early signs that the culture is settling correctly are first-day checks showing that the starter culture has been transferred and positioned without obvious immediate stress. These observations support an assessment of culture stability only when pH testing, the temperature reading, light placement, and the growing medium remain consistent with the selected kit instructions. The reviewed evidence does not establish one universal first-day colour, suspension pattern, temperature value, or surface appearance for every spirulina growing kit, so observations should be interpreted only against the manufacturer's guidance.
Use the checklist below to evaluate early signs that the culture is settling correctly before considering any adjustment.
Suppose an illustrative culture vessel shows even color consistency, a uniformly suspended culture, and a stable temperature reading after the first-day checks. Those observations suggest the setup conditions remain consistent, but starter culture strength and kit type can legitimately produce different first-day appearances without indicating a problem. Use the checklist below to evaluate early signs that the culture is settling correctly before considering any adjustment.
- Check color consistency: Compare the culture colour with the appearance described in the kit instructions. Expected safe cue: Even colour without sudden or unexplained separation. Next action: Recheck the kit instructions before changing the growing medium if the appearance differs.
- Check suspended culture: Observe whether the starter culture remains distributed through the growing medium. Expected safe cue: Even suspension or the settling pattern described for the selected kit. Next action: Use only the gentle circulation method specified by the kit if redistribution is required.
- Check for obvious debris: Inspect the culture vessel for material that was not present during setup. Expected safe cue: No obvious foreign debris or unexpected residue. Next action: Recheck the setup process rather than treating a single observation as a contamination diagnosis.
- Check the temperature reading: Compare the thermometer reading with the operating range specified in the kit instructions. Expected safe cue: The reading remains within the manufacturer's stated operating range. Next action: Review light placement or nearby heat sources before making other adjustments.
- Check light placement: Confirm that the light source still provides even coverage across the culture vessel. Expected safe cue: Uniform illumination without noticeable heat increase from direct exposure. Next action: Reposition the light source or culture vessel if coverage has changed.
- Check the surface condition: Observe whether the culture surface remains calm or shows only the gentle circulation specified by the selected kit. Expected safe cue: No excessive splashing or forceful agitation. Next action: Reduce circulation if movement exceeds the level recommended in the kit instructions.
Setup Mistakes That Can Weaken the First Culture
Setup mistakes that can weaken the first culture are installation conditions that increase first culture risk before regular growth begins. The most important conditions are unclean equipment, unsuitable water, medium imbalance, excess heat, poor light coverage, and weak agitation because each affects a different part of the starter culture environment. The reviewed section evidence does not define one universal pH value, operating temperature, light intensity, or agitation rate for every spirulina growing kit, so those conditions should be compared with the selected manufacturer's instructions before immediate correction is made.
Setup mistakes that can weaken the first culture are installation conditions that increase first culture risk before regular growth begins.
Immediate correction should focus only on the affected setup condition instead of changing multiple variables at once because isolated corrections make first-day observations easier to interpret. For example, suppose an illustrative 5 L culture vessel is prepared correctly but placed beside a warm window; moving the vessel back to the intended setup area addresses the excess heat condition without unnecessarily changing the growing medium or light source. The 5 L vessel is a hypothetical example used to explain the condition because the reviewed evidence does not specify a universal culture volume for all spirulina growing kits.
| Setup mistake | Affected condition | Likely risk | Immediate correction cue |
|---|---|---|---|
| Unclean equipment | Residue remains on the culture vessel or preparation tools. | Greater contamination risk that can reduce culture stability. | Clean or replace the affected equipment before continuing the setup. |
| Unsuitable water | Water does not meet the preparation requirements specified by the selected kit. | Chemical stress and a weaker start for the starter culture. | Prepare fresh water that matches the manufacturer's instructions before reuse. |
| Medium imbalance | The growing medium differs from the specified nutrient or pH preparation. | Poor growing conditions and delayed early culture development. | Verify the growing medium against the kit instructions before making adjustments. |
| Excess heat | The culture vessel is exposed to temperatures outside the kit's operating conditions. | Heat stress that can weaken early culture stability. | Move the culture vessel away from the heat source and confirm the temperature again. |
| Poor light coverage | The light source does not illuminate the culture surface evenly. | Uneven light exposure across the growing medium. | Reposition the light source or culture vessel to restore even coverage. |
| Weak agitation | The growing medium is not circulating as specified by the selected kit. | Settling and uneven exposure within the starter culture. | Use only the gentle circulation method recommended by the kit and confirm the culture is evenly suspended. |
Unclean Equipment, Unsuitable Water, and Medium Imbalance
Unclean equipment, unsuitable water, and medium imbalance are setup mistakes that increase first culture risk before or during starter culture transfer because they originate in the culture vessel, water, or growing medium rather than in later growth management. Residue on equipment, untreated or unsuitable water, incorrect dilution, poorly dissolved nutrient salts, and a pH mismatch should be treated as preparation errors, and the reviewed evidence does not establish one universal preparation volume, pH value, or dilution ratio for every spirulina growing kit. Verification against the selected manufacturer's instructions is therefore the correct correction point before making any adjustment.
Verification against the selected manufacturer's instructions is therefore the correct correction point before making any adjustment.
Unclean equipment, unsuitable water, and medium imbalance should be corrected by confirming the affected preparation condition instead of changing multiple setup variables at the same time. For example, suppose an illustrative 5 L growing medium contains the correct nutrient salts but visible undissolved particles remain after mixing; continuing to dissolve the salts and then repeating the pH check against the kit instructions is a safer correction than immediately adding more salts or water. The 5 L volume is a hypothetical example because the reviewed evidence does not specify a universal preparation volume for all spirulina growing kits.
| Setup mistake | Affected condition | Likely risk | Immediate correction cue |
|---|---|---|---|
| Unclean equipment | Residue or dirty tools contact the culture vessel or growing medium. | Higher contamination risk and reduced culture stability. | Inspect the equipment and verify cleanliness before restarting the transfer. |
| Unsuitable water | Water does not meet the preparation requirements specified by the selected kit. | Chemical stress and a weaker start for the starter culture. | Confirm the required water specification in the kit instructions before preparing fresh medium. |
| Incorrect dilution | The growing medium contains more or less water than specified by the selected kit. | Medium imbalance that changes nutrient concentration. | Verify the preparation volume before changing the mixture. |
| Poorly dissolved salts | Nutrient salts remain visibly undissolved in the growing medium. | Uneven nutrient distribution and an unreliable pH measurement. | Continue mixing until the medium is uniform, then repeat the pH check. |
| pH mismatch | The measured pH falls outside the manufacturer's specified range. | The starter culture enters growing medium conditions outside the kit requirements. | Compare the measurement with the kit instructions before making any pH adjustment. |
Excess Heat, Poor Light Coverage, and Weak Agitation
Excess heat, poor light coverage, and weak agitation are placement-related setup mistakes that can increase first culture risk after the starter culture and growing medium are combined. Unlike unclean equipment, unsuitable water, or medium imbalance, these errors affect the culture through light, temperature, movement, or container location after transfer. The reviewed evidence does not establish one universal grow-light distance, operating temperature, or agitation rate for every spirulina growing kit, so each condition must be checked against the selected kit instructions.
The table connects excess heat, poor light coverage, and weak agitation with their likely risks and proportionate correction cues.
Immediate correction should restore stable placement without changing the growing medium unless the kit instructions identify a separate preparation problem. A thermometer reading outside the kit-specific range, direct sun exposure, uneven illumination, visible settling, or repeated container movement signals that the affected placement condition should be corrected and checked again. The table connects excess heat, poor light coverage, and weak agitation with their likely risks and proportionate correction cues.
| Setup mistake | Affected condition | Likely risk | Immediate correction cue |
|---|---|---|---|
| Incorrect grow-light distance | The light source is positioned closer to or farther from the culture vessel than the distance stated in the kit instructions. | Closer placement may add excess heat, while greater distance may reduce light coverage. | Return the light source to the kit-specified position, then recheck coverage and the thermometer reading. |
| Direct sun exposure | The culture vessel receives uncontrolled sunlight after placement. | Solar heating may move the growing medium outside the kit-specific temperature range. | Move the vessel to the intended indoor setup area and confirm that the temperature returns to the specified range. |
| Poor light coverage | Part of the culture surface remains visibly darker or receives concentrated glare. | The suspended culture receives uneven light exposure. | Reposition the light source or culture vessel until coverage is even without adding noticeable heat. |
| Unchecked thermometer reading | The culture is left in place without confirming its temperature after setup. | Excess heat or unsuitable cooling may remain unnoticed during the first setup period. | Measure the temperature after final placement and correct the location before changing other conditions. |
| Weak agitation | The culture receives less gentle movement than the selected kit requires. | The starter culture may settle and receive uneven light or nutrient exposure. | Restore only the gentle circulation method stated in the kit instructions and confirm that the culture becomes evenly suspended. |
| Unstable container location | The culture vessel is exposed to repeated movement, vibration, drafts, or nearby heat sources. | Changing conditions make early observations harder to interpret and may disturb culture stability. | Place the vessel on a stable surface away from direct heat and unnecessary disturbance, then repeat the local placement checks. |